What's inside:
Our comprehensive guide, "How To Activate an eSIM on iPhone? The Travellers Guide," equips you with everything you need to transform your iPhone into a global travel companion. We'll walk you through the simplest method for activating eSIMs on iOS 17.4 and beyond. For those on earlier versions, don't worry – we've got clear instructions for you too. But it doesn't stop there! Our guide provides you with expert tips to manage multiple eSIMs effortlessly, keep your data usage under control while roaming, and stay connected throughout your adventures. Pack your bags, grab your iPhone, and let eSimmer handle the rest!
Chapter 01:
- How to activate an eSIM on iPhone (iOS 17.4+)
- Get yourself ready
- Install your eSIM on iPhone (prior to departure)
- Connect your eSIM (upon arrival)
- When should I install and connect my eSIM?
Additional Chapters:
02. Alternative eSIM Activation on iPhone: QR and Manual Methods
03. Unable to activate eSIM on iPhone? 9 Fixes to Get You Connected (Fast!)
04. Travellers Rejoice: Exploring the Benefits of having multiple eSIMs on Your iPhone
05. How to Limit Data Usage on Your iPhone While Travelling
Since the iPhone Xs/XR, Apple has embraced and evolved their eSIM technology. While iPhones outside the US have both an eSIM and physical SIM slot, the iPhone 14 (US version) eliminates it entirely. This signals a future where Apple will likely remove the physical SIM slot from iPhones altogether.
One of the biggest advantages of eSIMs for travellers is the ability to store and use multiple SIMs on a single iPhone. This allows you to easily switch between a travel data plan when you're overseas and your home telco provider when you return, ensuring uninterrupted connectivity and sidestepping costly data roaming fees.
Grasping eSIM terminology can be tricky, as terms vary with the iPhone’s Language & Region settings. To ensure clarity, this guide is tailored using terminology for the Australian market.
Chapter 01
How to activate an eSIM on iPhone (iOS 17.4+)
Preparing for a trip? Let’s get you up to speed with the latest method for adding an eSIM on iPhones with iOS 17.4 or later, released in Mar 2024. This hassle-free approach lets you add your eSIM directly from the QR code in our eSimmer email, eliminating the need for scanning with a camera and juggling multiple devices.
If your iPhone is running iOS 17.3 or earlier, please refer to Chapter 02 for an Alternative Guide on additional methods for activating an eSIM on your iPhone.
Remember to check your device is unlocked and eSIM-compatible, then follow our instructions below.
Get yourself ready
Before setting off, we recommend installing your eSIM at your home or in the office, where your internet connection is stable. This avoids relying on patchy or insecure wifi abroad and ensures you’ll have immediate data connection as soon as you touch down.
To get started, simply open the eSimmer email containing the QR code on your device, and read on.
Install your eSIM on iPhone (prior to departure)
1. To start your eSIM install, refer to our eSimmer email and scroll to the QR code.Display QR code > Press & hold QR code image > Select “Add eSIM” > Tap “Allow”

💡In most cases, an eSIM QR code can only be installed once. You should not cancel the installation process once started.
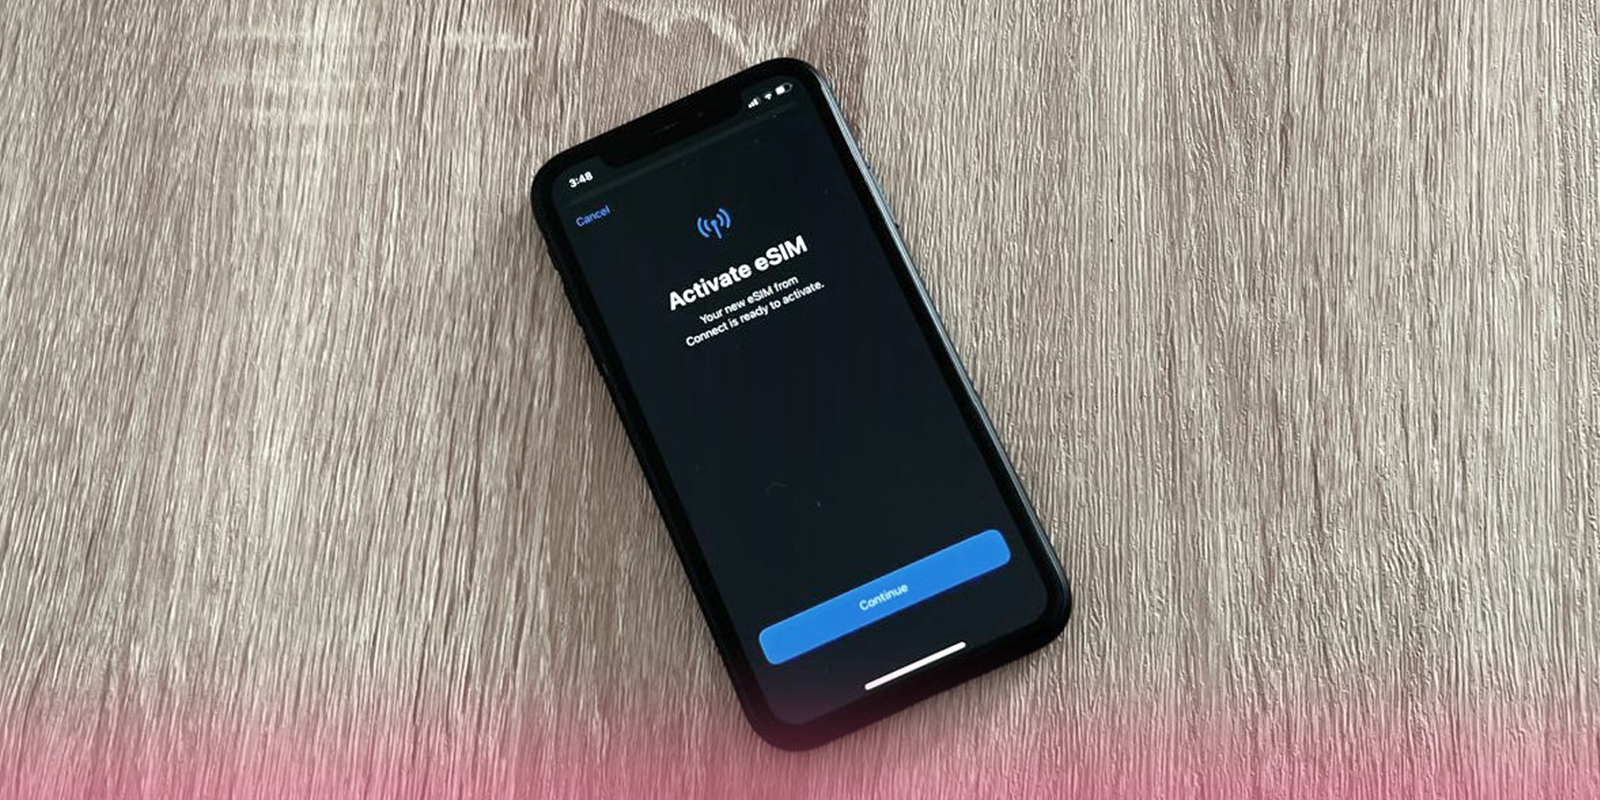
2. Proceed with Activate eSIM
When prompted, tap “Continue” (activating may take a few minutes).

Your home number is your Primary SIM, we want to maintain this as your Default Line.
If you're still at home, choose Primary SIM as your line for Mobile Data. Upon arrival this will need to be updated.

Connect your eSIM (upon arrival)
Landed and ready to roam? Follow these final steps to get your travel eSIM connected at your destination.
By default your new eSimmer eSIM will likely be labelled as Travel, Personal or Business or another pre-set iOS name. If you are using eSIMs for travel regularly, it's recommended that you rename it with a country label. This way it's easy to spot which eSIM is for which destination.
4. Open Settings > Select Mobile > Under "SIMs" Tap your new Travel eSIM
Toggle Turn on this Line “ON” and Turn Data Roaming “ON”

5. Return to Mobile > Tap “Mobile Data” > Select your new “Travel eSIM” as your Mobile Data source.
Ensure “Allow Mobile Data Switching” is turned OFF.

Turning ON your travel eSIM at your destination will connect you to the local network, activating your data plan to start from that day.
When should I install and connect my eSIM?
While it’s recommended to install your travel eSIM prior to departure and complete the connection steps upon arrival. If your pre-travel to-do list is bursting at the seams and you didn't have a chance to complete the install at home, don’t fret. At your overseas destination, find a stable local wifi connection and complete steps 1-5 listed above. Upon completion, you will have an instant data roaming connection via your eSimmer travel eSIM.
Travelling can be stressful, and staying connected shouldn't add to it. In this article, we've covered everything you need to know about installing our eSimmer eSIMs on your iPhone running the latest iOS 17.4 or later. If your iPhone is running an iOS 17.3 or earlier refer to Chapter 02 for an Alternative installation guide. We understand eSIMs can be a little fiddly to figure out at first. If you need some additional assistance, please don’t hesitate to email - support@esimmer.com. We’re here to help!
FAQs about eSIM on iPhone
Can I add multiple eSIMs onto my iPhone?
- Yes, most iPhones that support eSIM, you can have up to 5 or more eSIMs, with two being active simultaneously. It depends on your iPhone model, but in a large percentage of iPhones, you can use your traditional SIM card and an eSIM simultaneously.
Can I switch between different eSIMs on my iPhone?
- Yes, you can switch between different eSIMs on your iPhone. The process involves accessing your device's settings and selecting the desired eSIM as the active line for your mobile data and other services.
Does installing an eSIM mean it is activated automatically?
- No, it doesn't. Installing an eSIM profile is simply the act of provisioning the necessary information for the eSIM profile. Activation occurs when you connect to the mobile network in your destination country. The first activation is when your travel SIM plan starts, and you can enjoy your data allowance for its full duration, either 10 or 30 days.


