Welcome to the second instalment of our comprehensive guide, “How To Activate an eSIM on iPhone: The Travellers Guide.” In this article, we delve into the alternative methods of eSIM activation for your iPhone. Whether you're using a recent iOS version or an older one, we will guide you through the steps specific to your iPhone model. We will also clarify situations where you might need a second device to display the QR code. Let's ensure your eSIM adventure starts as smoothly as your travels!
We'll cover:
- QR Code from Photo Gallery (iOS 17.3 and below)
- Camera Scan QR Code (iOS 16 and below)
- Manual eSIM Activation (All iOS versions)
Not sure which iOS version you're on? No problem! Just check your Settings App - tap "General" followed by "About". At the top, you'll see your current iOS version.
Chapter 02
QR Code from Photo Gallery (iOS 17.3 and below)
For iPhones running iOS 17.3 or earlier, activating an eSIM can be done using a QR code stored in your Photos app. This handy method eliminates the need for another device to display the code. We will show you how to save the QR code from our eSimmer email, and then seamlessly activate your eSIM using your iPhone's Photos Gallery App.
Get Yourself Ready
First up, check that your iPhone is eSIM-compatible and verify that your device is unlocked. Then, ensure you're connected to a stable Wi-Fi or internet connection. Finally, have our eSimmer email with the QR code open on your device.
Install eSIM from your iPhone Photo Gallery (prior to departure)
1. Save your QR code to your iPhones Photo Gallery.Display QR code > Press and Hold on the QR code, Tap “Save to Photos”

2. To start the eSIM install process open the Settings App.
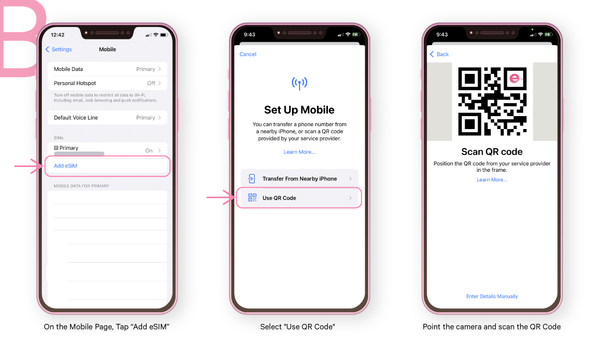
Open Settings > “Mobile” > Select “Add eSIM” > Tap “Use QR Code”


Proceed with Activate eSIM by tapping “Continue” (installation may take a few minutes).
When prompted, tap “Continue” and label your new eSIM, as “Travel”

Your home number is your Primary SIM, we want to maintain this as your Default Line.
If you're still at home, choose Primary SIM as your line for Mobile Data. Upon arrival this will need to be updated.

Connect your eSIM (upon arrival)
Landed and ready to roam? Follow these final steps to get your travel eSIM connected at your destination.6. Open Settings > Select Mobile > Tap your new Travel eSIM > Toggle “Turn on this Line” ON. And Turn Data Roaming “ON”

Ensure “Allow Mobile Data Switching” is turned OFF.

Turning ON your travel eSIM at your destination will connect you to the local network, activating your data plan to start from that day.
Camera Scan QR Code (iOS 16 and below)
For iPhones running iOS 16 or older versions, the traditional method of activating an eSIM with the camera remains available. We will provide step-by-step instructions on launching the Camera app, scanning the QR code from your eSimmer confirmation email, and finalising the eSIM activation process on your iPhone.
Get Yourself Ready
Before you begin, make sure your iPhone is eSIM-compatible and unlocked. Then, connect to a stable Wi-Fi or internet connection. Finally, have our eSimmer email with the QR code readily available on a second device, or printed out for easy access.
Install eSIM with your iPhone Camera (prior to departure)
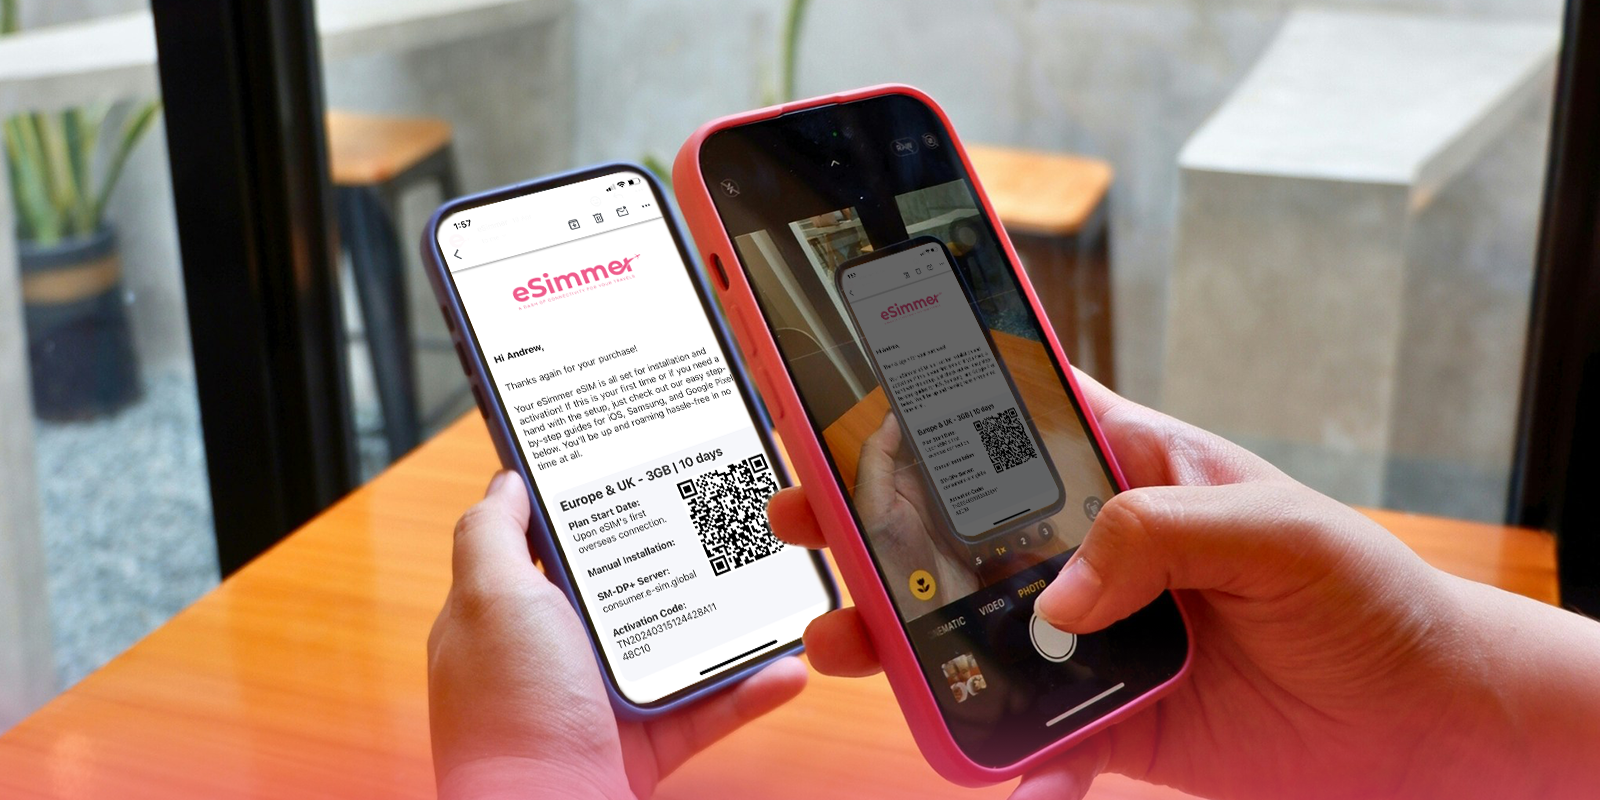
1. Open the Camera App and Scan the QR codeYour iPhone will auto detect the QR code as a Mobile Plan from eSimmer.
Tap the yellow notification that reads “Mobile Plan”

Alternatively, Apple provides a second option for scanning an eSIM with your iPhone Camera, as follows.
B. Open Settings > Select Mobile > Tap "Add eSIM" > Select "Use QR Code"
When the camera is open, point and scan the QR Code. It's likely that the scan will be instant and you can safely proceed to the next step.

To complete your eSIM activation on your iPhone, refer to steps 4-7 above from the “QR Code from Photo Gallery” method. These later steps are exactly the same for both installation methods.
Manual eSIM Activation (All iOS versions)
Can't scan the QR code? No problem! Maybe your camera isn't working, or you don't have another device or a printout handy. That's where manual activation comes in. This method uses manual installation details from our eSimmer confirmation email. We'll walk you through finding this information and manually activating your eSIM through your iPhone's Settings.
Get Yourself Ready
First, verify eSIM compatibility on your iPhone and confirm your device is unlocked. Connect to a reliable Wi-Fi network or ensure you have a stable internet connection. Lastly, open our eSimmer confirmation email containing the SM-DP+ Address and Activation Code (located alongside the QR code). Keep it handy during the setup.
Manually Install an eSIM on your iPhone (prior to departure)
1. Open Settings > Select Mobile > Tap "Add eSIM"Tap "Use QR Code" although you will not be using a QR code. On the Scan QR code screen refer to the "Enter Details Manually" at the bottom and select it.


To complete your eSIM activation on your iPhone, refer to steps 4-7 above from the “QR Code from Photo Gallery” method. These later steps are exactly the same for both installation methods.
This guide has comprehensively covered the alternative methods of eSIM activation on iPhone, ensuring a smooth start to your travels. We've explored activating via QR code from your iPhone's Photos app (iOS 17.3 and below), camera scanning the QR code (iOS 16 and below) and manual activation (all iOS versions). By following these clear instructions, you'll be equipped to activate your eSIM with or without a QR code, and be ready to connect upon arrival at your destination. Now, you can focus on planning your itinerary and packing your bags, knowing your eSIM activation is under control. Bon voyage!
Frequently Asked Questions
Can I use a travel eSIM alongside a physical SIM card on my iPhone?
Yes, the iPhone XS series was the first iPhone model to support dual SIM card with eSIM, allowing you to use an eSIM and a physical SIM card simultaneously. This enables you to have two separate mobile plans active on your phone, useful for travellers looking to add a second cost effective eSIM data plan while abroad.
What happens to my existing phone number when I activate an eSIM?
Activating a travel eSIM won't affect your existing phone number. It simply adds a new data plan to your iPhone. Your existing number will remain on your physical SIM card.
Where can I buy a travel eSIM for my iPhone?
Look no further than eSimmer! We offer a wide range of travel eSIM data plans specifically designed for iPhones. Our secure online store allows you to easily purchase an eSIM plan that perfectly matches your travel destination and data needs.
In just a few clicks, you can be ready to activate your eSIM and stay connected throughout your trip. Browse our selection of travel eSIMs to find the perfect fit for your adventure!
