
What's inside:
Island hopping across Southeast Asia, backpacking through the vibrant streets of Europe? Wherever your travel takes you, staying connected is paramount. This travel companion, the aptly named Samsung Travel Guide: eSIM Activation & More, is your one-stop shop for conquering the complexities of mobile connectivity with your Samsung device. This guide dives into the world of eSIM technology on Samsung devices, guiding you through the activation process with crystal-clear steps. So, pack your bags, grab your phone, and get ready to roam with confidence!
Chapter 01:
- How to Activate an eSIM on Samsung?
- Prep Before You Travel
- Install Your eSIM on Samsung with QR Code
- Connect your eSIM (upon arrival)
- Manual eSIM Installation Samsung
- When to Install Your eSIM?
Chapter 01
How to Activate an eSIM on Samsung?
Did you know that the first Samsung phone to include eSIM capability was the Galaxy Fold, released in September 2019? Since then, Samsung, a titan in the global phone market, has embraced the shift from traditional SIM cards to eSIMs across all their flagship phone models. Today we’re diving into how to activate eSIM on Samsung—a digital leap for travellers everywhere.
Prep Before You Travel
Before you jet off, it’s wise to activate your eSIM while still in the comfort of your home. This way, you sidestep the potential pitfalls of spotty or insecure Wi-Fi abroad. Kickstart this adventure by ensuring your Samsung phone is eSIM-ready here. Then, refer to our quick guide tailored for the Galaxy S24 with Android 14, though steps may vary slightly based on your model and operating system:
To get started, simply open the eSimmer email containing the QR code. Either save the QR code image or take a screenshot, then share the code to a second device. Alternatively, if you have a printer on-hand, this is also workable.
Install Your eSIM on Samsung with QR Code
To start the eSIM install process, open “Settings” > Select “Connections” > Tap “SIM manager”

Select "Add eSIM". Grab the second device with the QR code (or print-out).
Select “Scan QR code” as the method for adding your eSIM. Point and Scan.

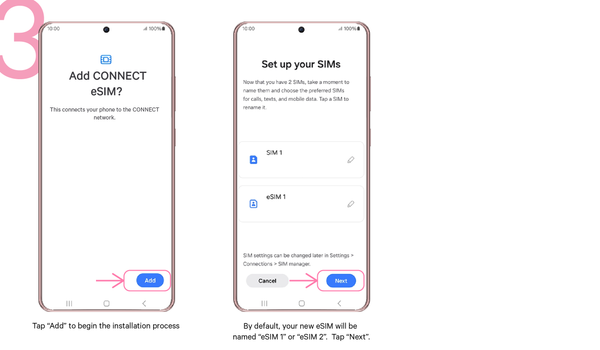
When prompted to “Add Connect eSIM?”, tap “Add” to begin the installation process
Installation can take up to 5 minutes. Once complete, you’ll see your new eSIM in the list. By default, your new eSIM will be named “eSIM 1” or “eSIM 2”.
Tap “Next”.
When prompted, select “SIM 1” as the Preferred SIM for Calls and Messages.
Your home number is your SIM 1, we want to maintain this for Calls and Messages.
If you're still at home, choose “SIM 1” as your line for Mobile Data. Upon arrival this will need to be updated. Tap “Done”.

Connect your eSIM (upon arrival)
Landed and ready to roam? Follow these final steps to get your travel eSIM connected at your destination.Select “Connections” > Tap “SIM manager” > Select “Mobile Data”
Change the Mobile Data selection to “eSIM 1”.
Ensure “Data switching and backup calling” is turned OFF.

Return to the “Connections” page > Tap “Mobile networks” > Toggle “Data Roaming” ON

Turning ON your travel eSIM at your destination will connect you to the local network, activating your data plan to start from that day.
Manual eSIM Installation Samsung
For manual eSIM installation instructions on your Samsung device follow the steps below:
Open Settings > Select “Connections” > Tap “SIM manager”
Select "Add eSIM" > Tap “Scan QR code”
TAP “Enter activation code”
To be able to Manually install the eSIM, you will need your "SM-DP + Server” and "Activation code" provided in our eSimmer email.
You must enter in the format of 1$ SM-DP + Server then $, followed by the Activation code. eg TB60280314121229AH9705DB
Refer to the visual guide below.
When to Install Your eSIM?
Ideally, install your eSimmer travel eSIM before departure. If you’re pressed for time, don’t sweat it. Once you find stable Wi-Fi overseas, follow the steps above, and you’ll be all set.
Whether you’re activating your eSIM before departure or upon arrival, Samsung makes it easy to stay connected. With these steps, you’ll discover how to use eSIM on Samsung for a hassle-free travel experience. Dive into your journey with confidence, knowing that Samsung’s eSIM technology has got you covered. Safe travels and happy roaming!
Frequently Asked Questions
How does eSIM activation differ across Samsung phone models?
The core process of eSIM activation remains largely consistent across Samsung's smartphone lineup. However, there can be subtle differences in the specific menu navigation and terminology used, primarily due to variations in Android versions and Samsung's custom user interface (One UI) overlays. Newer models running the latest Android and One UI builds tend to have a more streamlined and intuitive eSIM setup process, while older devices may require slightly different menu paths. Regardless of the model, the underlying concept of scanning a QR code or manually entering the eSIM details remains the same across Samsung's eSIM-capable phones.
How to switch between eSIM and physical SIM?
To switch between an eSIM and a physical SIM card, simply navigate to the SIM manager settings, select your desired SIM, and set it as the preferred option for calls, messages, and mobile data. The other SIM will be deactivated until you switch back.
What if eSIM activation fails or gets stuck?
If the eSIM activation gets stuck or fails, try restarting your device. If that doesn't work, you may need to remove and re-add the eSIM profile or reach out to our eSimmer support team for further troubleshooting assistance. Ensure you have a stable internet connection during the activation process.


